

Welcome to the help page. Select an icon from the topics below to find out more.
Schleicher SSO
Help with Mastodon (Schleicher.Social)
Blog Help (Family.schleicher.social)
Adding new posts
How to add new posts via front-end form
Followers
How to use the follow feature
Family Spreadsheet Exports
Exporting and creating labels
Email Posting
How to add new posts via email
Family Tree
Viewing and Using the family tree
Email Preferences
Changing or configuring site notifications
Family Spreadsheet
Changing, adding, and updating info
Everything Else
Schleicher SSO

Schleicher SSO is a new way of linking together Schleicher Social and the Schleicher Homepage. Using Authentik as the Identify Service Provider (IDP), you can log into either application with the same email or username. Similar to how SSO works with most companies, once logged in with the IDP your status persists throughout the browser session. Accessing either application simply requires one-click login (after initial authorization with the either application).
Registering a new account
New account registration takes place directly through Schleicher SSO from either Schleicher Social or the Schleicher Homepage.
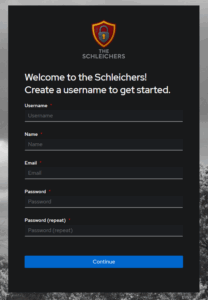
To register a new account select “Register New User” from the bottom of the login page (if you are on the Schleicher Homepage) or “Create Account” from Schleicher Social. Complete the initial registration form and set your password.
Link an existing account
If you have an account in either Schleicher Social or the Schleicher Homepage you will want to link your account. To do so you’ll need to register through Schleicher SSO using the same email you used with the application (the IDP looks for matching emails to merge accounts). Once registered with the SSO IDP, you will be directed back to the Schleicher Homepage. At this point you will be able to access either Schleicher Social or the Schleicher Homepage through SSO.
Logging in with SSO
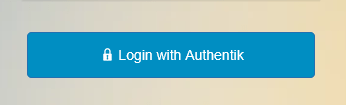

In either application, hit the SSO option (Login with Authentik or Login with SSO) to be taken to the IDP. Login using the credentials you created at registration.
Importantly, the credentials created initially for Schleicher Social and the Schleicher Homepage will not work until you’ve linked them through Scheicher SSO and everything syncs; once you’ve created credentials through SSO you’ll use those for logging into all apps.
Once logged in (to either application), you can simply hit the SSO link in the other application (rather than entering your information again). As long as you have not closed the browser your session information is retained (even if you log out of the other site) at the IDP level.
Profile Management
Profiles for each application are still managed by the respective application, with some exceptions. As a rule of thumb, however, an email or password changes should always be handled through the user page at Schleicher SSO.
- Schleicher Homepage password updates (forgot password, change password) will be redirected to Schleicher SSO.
- Email updates from the Schleicher Homepage are also handled by the SSO portal; email changes will sync back to your profile when updated.
- Account details in Schleicher Social are locked (email and password updates) and managed through Schleicher SSO.
Outside of those caveats, all other profile information is updated in each respective platform.
Setting up Multifactor Authentication (MFA)
MFA setup is completed through Schleicher SSO and is highly encouraged. To MFA setup, click the Schleicher SSO link from the footer menu of the homepage or visit auth.schleicher.social while logged in.
You can set up multiple MFA options (and it is encouraged to do so). TOTP can use any authenticator app (Authy, MS Authenticator, Google Authenticator, etc.).
- TOTP Authenticator-based MFA ✅ (Best)
- Device-based MFA (using Windows Hello, Bitwarden, etc.) ✅ (Better)
- Static codes ☑️ (Okay)
- Email OTP ⛔️ (Least secure)
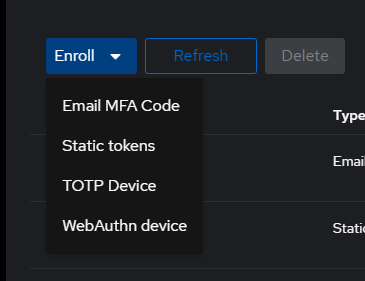
In Schleicher SSO hit the gear icon in the upper right to open your account settings menu.

Next, select the “MFA Devices” link in the menu, and then the “Enroll” dropdown. Select the method of MFA you want to setup and follow the prompts to enroll in that method. Note that you can also disenroll methods from this screen as well as update those methods.
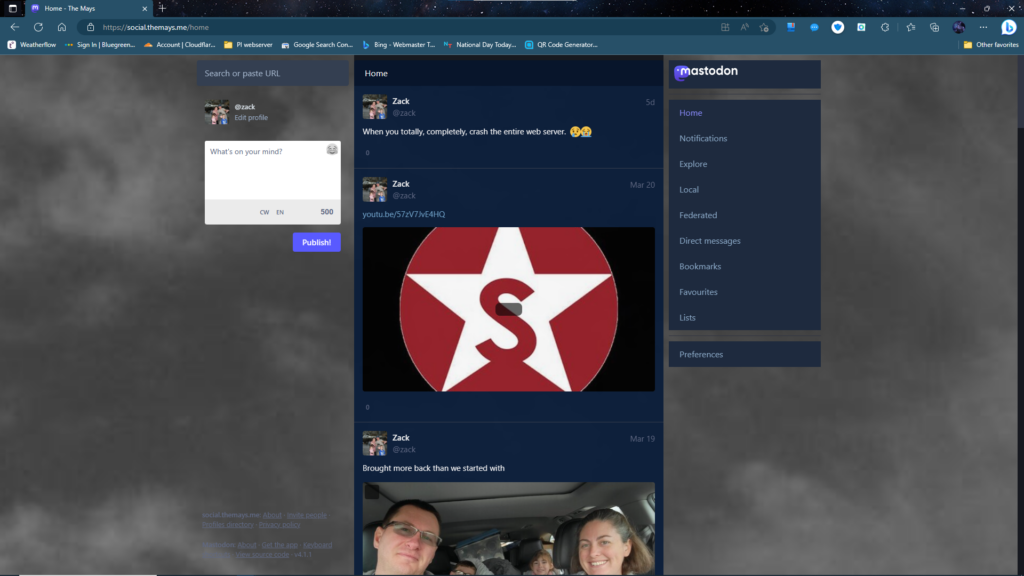
Mastodon
Mastodon is the social side of the Schleicher Homepage. Think of it like a X-esque style of posting. The main difference…you won’t see any ads or upsells. Use it like you would any other social media app; you’ll have to follow family members to populate the feed, and posting can be private or public (e.g., just your followers see it, or everybody can see it in the public timeline).
Server Status


Schleicher Social
Joining schleicher.social
To join, simply hit the “Create Account” link and register a new account in Schleicher SSO. Remember that you must have a matching email in the Schleicher Address Book to register.
Setting up your profile
To change your avatar and header image, head to the “Preferences” menu on a desktop browser and click the “Profile” link or click your avatar icon on mobile. Update your Avatar and Header image by uploading a new image.
You can change the appearance of your instance from the “Preferences→Appearance” menu. Note that the default interface is a “Twitter-like” media stream, while the advanced interface adds additional feeds for notifications, mentions, etc.
Additionally, under the “Preferences→Other” menu you can set your post visibility. By default posts are public and everyone can see them. If you wish your posts to remain private to only your followers you can change this setting here.
You can set up 2FA to secure your account. Go to “Preferences→Account→Two-Factor Auth” to set up 2FA. You can use any app of choice, including MS Authenticator, Google Authenticator, or Synology Secure Sign-in.
You can require manual approval of follow requests by going to “Preferences→Profile→Appearance→Require Follow Requests”. You’ll receive a notification on any new follower and have the ability to manually approve the request.
Updates to your password and email are handled through Schleicher SSO. To update, after logging into either the homepage or Schleicher Social, visit Schleicher SSO and update your account settings. Updates will push to Schleicher Social and the homepage on next login.
Timeline Views
Mastodon displays posts in a timeline. You’ve got two timelines: your home timeline for posts you create and for posts created by people you follow, and the federated timeline for all public posts. For the desktop client, you can display posts and timelines using either the legacy timeline view, or the advanced timeline view (change this from “Preferences→Appearance→Enable Advanced Web Interface”.
The advanced web interface allows tailoring of the timelines you see. The “Home” timeline only displays posts you create and posts from members you follow. To see posts of all users, view the “Federated” timeline. Any user that has their posting status set to “Public” will have their posts displayed here.
Follows and Followers
Like other social media feeds, to populate your home timeline you will need to follow other users. Since this is a family server, I recommend just following everyone as they sign up and post. You can follow other members from the “Notifications” section in the advanced web interface on the browser client, or by going to the “Search” tab in the mobile app and typing in the name or username of the person you want to follow.
From other the mobile app or desktop version, you can follow a member from a post by opening the options menu for that post and selecting the follow option.
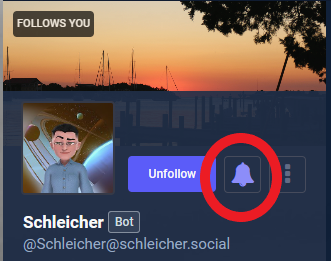
Suggested Follows
On initial signup you’ll be presented with a few suggested accounts to follow. While I recommend following everybody…I would at least follow the Schleicher account. It’s a bot account, but the bot autoposts birthdays, events, anniversaries, reminders, etc. For the bot, I also suggest following the posts; by default Mastodon will not notify of new posts, but you can change this. To do this, click on the name of the profile you want to follow, and then in the web browser interface click the bell icon to enable post follows:
Mobile App Alternatives
If you already follow a Mastodon server, or just want to try a different mobile app, several apps are available. One of the most common is Tooot, available on Android and iPhone. This sign-up process for the server is similar. An advantage of Tooot over the vanilla Mastodon app is the ability to switch accounts, as well as a more intuitive way to view all posts on a server. Another popular alternative is Tusky, which is similar to the native Mastodon app but allows for multiple accounts and expanded account settings.
Posts (or "Toots")
Posts, or toots, need to follow some basic guidelines. Think of Mastodon like Twitter; posts should be short and to the point, and media uploads should be fairly small. If you need a larger space to write, consider making an account on the Schleicher homepage and adding a full blog post.
- Posts should be 500 characters or less
- Media uploads must be 2MB or less; use a photo editor/optimizer to truncate if needed
- Hashtags are good (but count in the character limit) to help others find posts
If you want to show off a bunch of photos, your best bet is to upload those photos to your cloud storage of choice and make a publicly accessible link. Copy that link into the toot, or put it in the blog post and link to the blog post in Mastodon. We want to see, as well as be told about, what everyone is doing! Write the post and then link it on Mastodon to show it off and notify everyone!
Direct Mentions
For direct messages to another member, simply type @displayname and you’ll start a private message feed with that user.
Push Notifications
So how about getting push notifications when someone posts? Like Facebook, Twitter, Instagram, and other social media platforms, your home feed is populated with the posts of people you follow. Unlike Facebook and other platforms, you can see the entire news stream by viewing the federated timeline. Would you want a push notification every time a friend posts on Facebook? Probably not, since you’d be overwhelmed by all those notifications in a short period of time.
That being said, you can get a push notification for specific users, or all users. This post details the process for following the bot, and can be used to receive push notifications from any user.
Family Schleicher Blog
Adding new blog posts
Registered site users can add new posts from the site front-end. Once your account is activated, login and click the “Add Post” menu link.
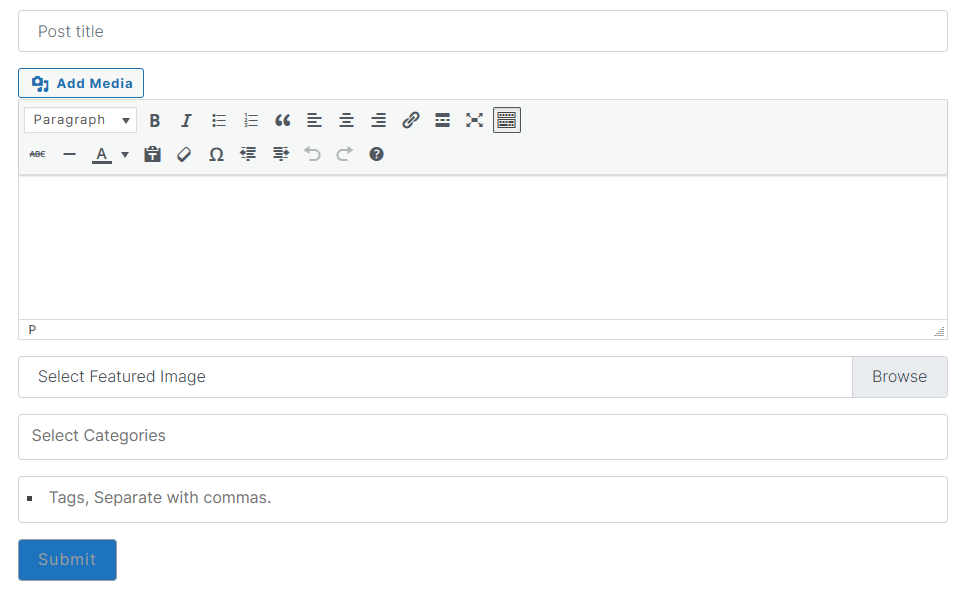
To add a post include a post title, content, and any relevant categories or tags. Note that categories are added by site admins and cannot be edited from the front end page. Tags can be entered and separated by commas; tags may be freely added.
Featured images can be added but keep the image sizes to 2MB or less. Images cannot be added directly to the editor, however, images from hyperlinks may be added using html markup.
Adding new Boar Reports
Boar Reports are sent through the Newsletter plugin and are managed by a template system. To send you’ll first create the Boar Report, publish, then send using the Weekly Update template in Newsletter.
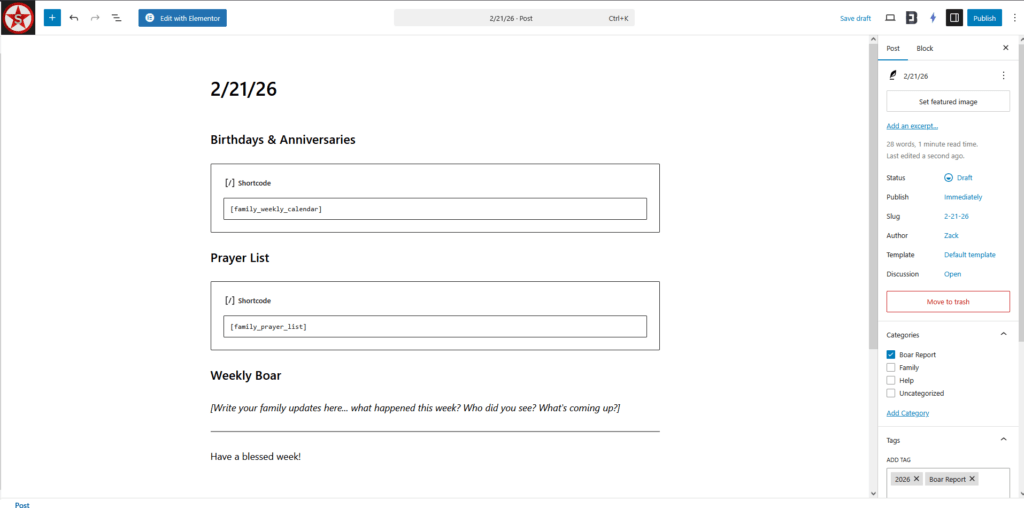
Create the post

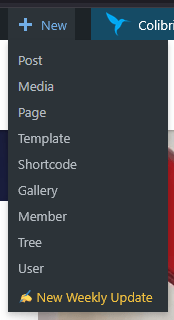
To create the post, first select the “New Weekly Update” option from either the admin bar from the frontend or from the Posts page in the admin dashboard. This automatically loads a the Boar Report template and titles the post with the current date.
The template will autofill most information, including birthdays and anniversaries over the next 14 days, any active prayer requests, a random holiday, and the post category and tags.
For the content, simply fill out the section under “Weekly Boar”. You’ll also want to select a featured image (Instant Images is a great royalty-free source) or upload an image. Note that images are limted to 6MB, but 2MB or less is best. Once you’re done, hit publish and confirm. The post will publish to the site and the bot will post it to Schleicher Social.
Create the Newsletter email
Next, to send the email blast you’ll select “Newsletters” from the admin menu by hovering over the “Newsletter” plugin title. From there, hit “Add New”.
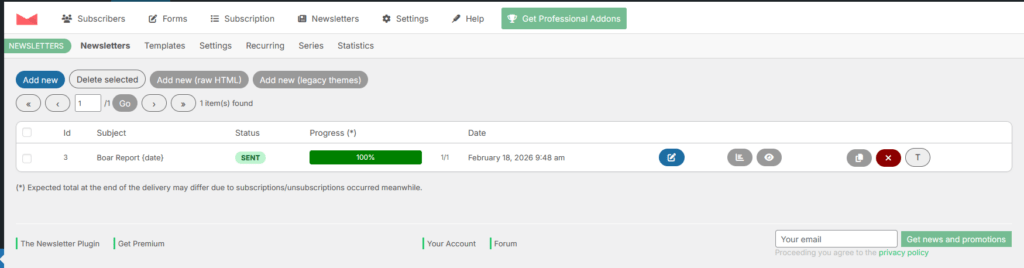
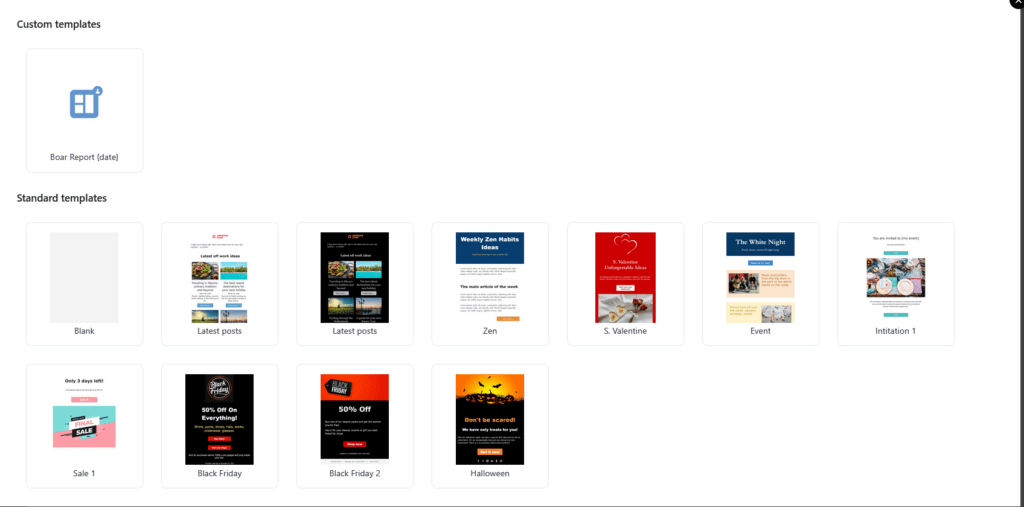
Next, select the “Boar Report” custom template. This automatically pulls in the last post in the Boar Report category. You do not have to add or change anything in the email template.
Finally, you’ll nit next. For targeting, drop the list down to select “Boar Report”. Hit “Send now” to start batch sending.
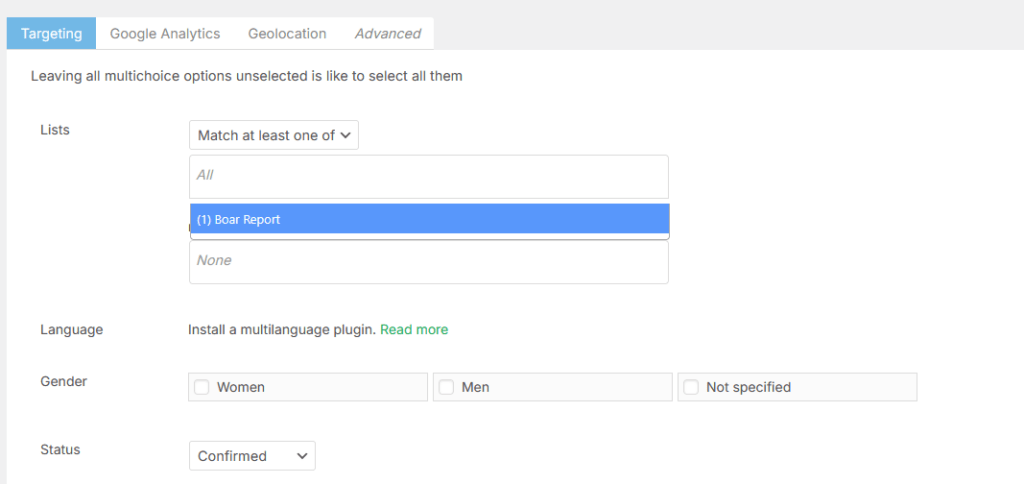
After hitting Send Now the plugin will start batch sending out to anyone with the Boar Report subscription enabled in their preferences. Note that like any other email, once the send is started you can’t change it. Note that you can also schedule send.
Followers
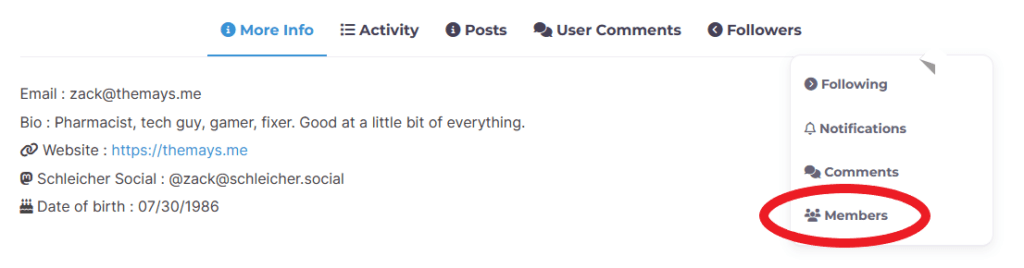
You can also follow blog users. Following users will send you a notification email whenever that user posts on the site; like schleicher.social, there is a bot that will generally autopost Boar Reports that I would recommend following. To follow someone, start by logging in and heading to your profile menu (under your account drop-down, select Profile). On your account tabs, select “Members” (hover over the “…” to open additional tabs if needed):
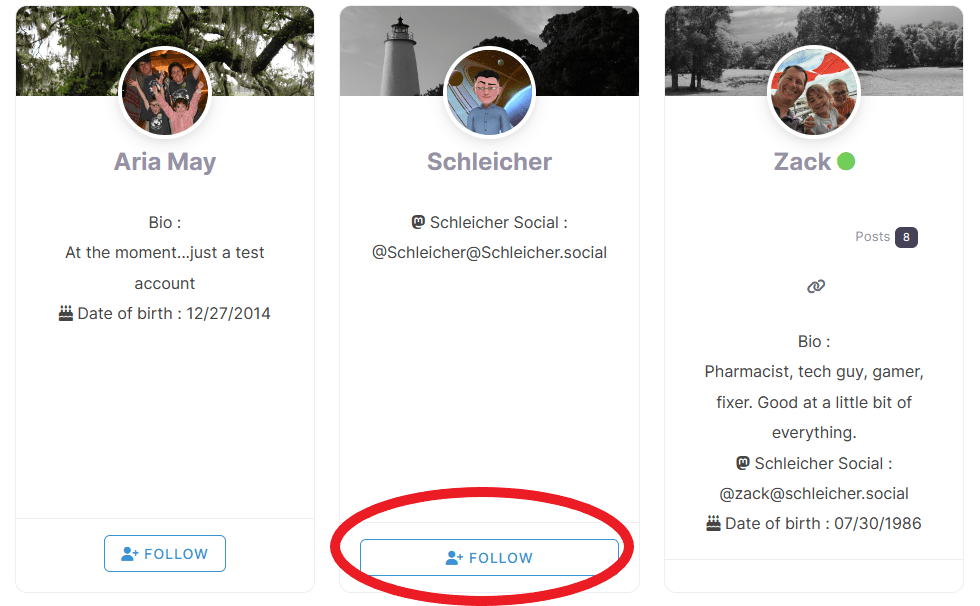
You’ll get a user carousel displaying each member’s basic account info. To follow a user, just tap the follow button on the botton of their profile card.
The Family Tree
In your profile menu the current family tree can be displayed. The tree starts with Grandma and Grandpa Schleicher; currently we’re up to 5 generations of Schleichers.
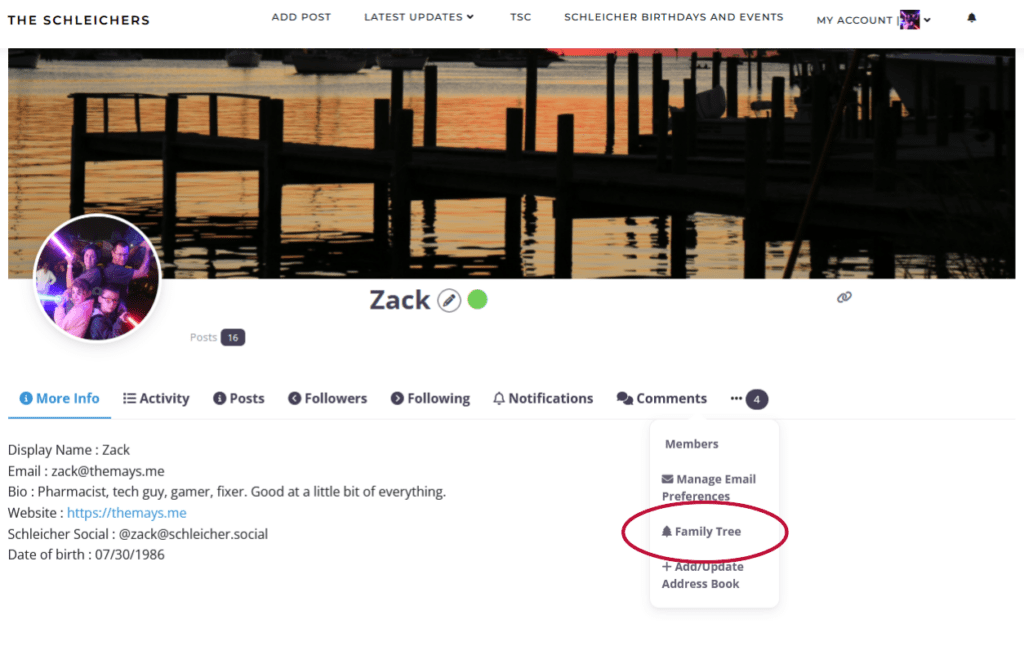
To get to the family tree, log in and open your profile menu. On your profile tabs (you may need to expand the dot menu, if you have one), select “Family Tree”.
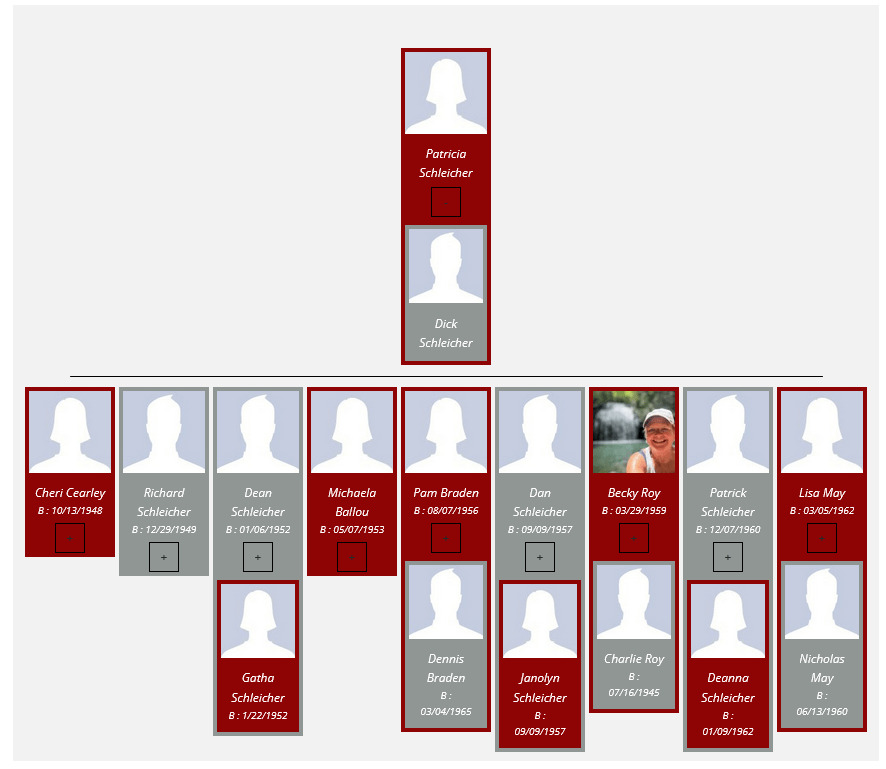
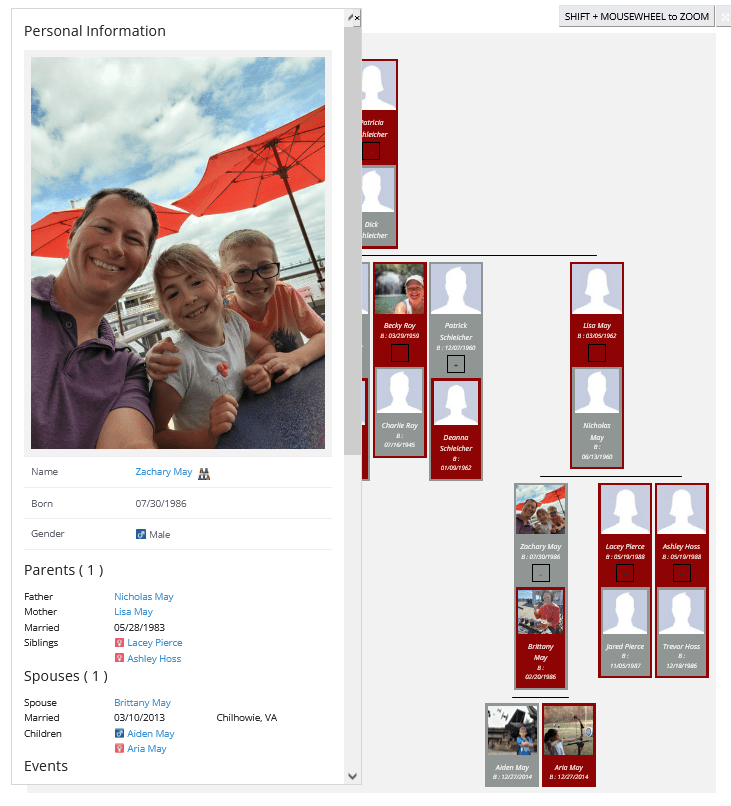
The initial tree is collapsed, but clicking the “+” icon will expand it to the family units for each member. Clicking any family member’s name will bring up the info card for that member which will include parents, spouses, siblings, children, and important dates (if available). Info cards also have contact information.
To move the tree, on desktop click and hold while dragging the mouse to move the tree (as you expand the tree it will stay in the frame). On mobile, press and move your finger to drag the tree. To zoom in and out, on desktop hold shift while scrolling the mouse wheel (note that you must be in the gray area of the tree window). On mobile or touch devices pinch in or out to adjust the zoom.
The Family Spreadsheet
Sheet Access
Access the sheet from the Schleicher home page; you will be required to log into the site to access the sheet.
Sheet Updates
Sheet updates are handled directly in the site. To update, click the row of the family member you need to update and then the “Edit” option. Alternatively, you can double-click the cell you need to update to in-line update. Note that because this is a direct database interaction any changes will take a moment to save and process.
Exporting the sheet
You can export the spreadsheet for use in most online address books. The sheet will download a CSV file that can be edited for import; most online tools will import with no additional editing.
- Click the “Export” dropdown.
- Click your preferred export (CSV for address book importing)
- In the address book of the site select the option to import contacts; match the fields of the downloaded CSV file to the fields in the address book as required.


Export Options
To make importing/exporting easier with various address books, or for those that print their labels at home, there are multiple export options available.
- The ‘family’ family (e.g., The Schleicher Family)
- This export option breaks the main list up into households, addressing each household by last name. For households with one (1) member, it will just add the member (e.g., Abby Schleicher vs. The Schleicher Family)
- Listed Names
- This option lists each family member in a household by name
- Formal Addressing
- The formal addressing option follows traditional formal addressing rules as much as possible. Households are addressed by “Mr. and Mrs. John Smith”, and children (if any), are listed by first name. Titles are considered as well as relational structure of the household (e.g. domestic partners, spouses, adult children, etc.).
To export each table just hit the export option at the upper left of the table. Importantly, the export option only exports the current view. E.g., if you want to export the whole table, make sure to show “all” entries before downloading.
Exporting for use in Word
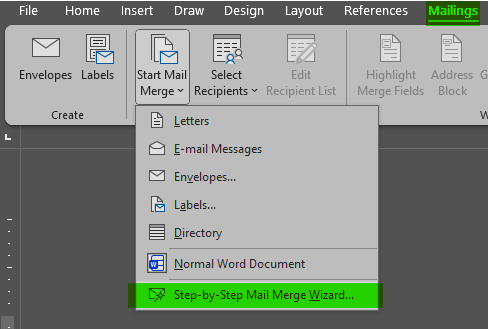
Sheets are able to be exported and then used in Word for mail merge and labels. First, export the sheet you want to use for your labels.
Once your file is downloaded, open a blank document in Word.
Click the “Mailings” tab and then drop down the “Start Mail Merge” menu. We want the “Step-by-Step Mail Merge Wizard”. This will walk you through the rest of the merge process.
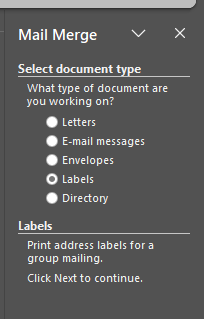
Select your project, in this case we’ll be doing labels.
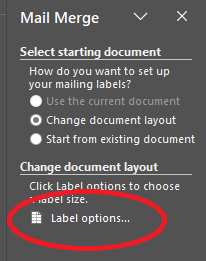
Now we need actually select our label format; Word has most Avery label formats built in, click on “Label Options”.
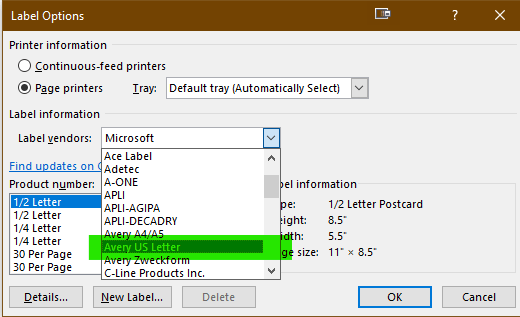
In the modal, pick the “Label vendors” dropdown, and select “Avery US Letter” (or your actual label vendor if Word has it preloaded; Avery is most common). Next, under product number select your actual label number (e.g., 5160 Address Labels).
The next couple of steps actually set up the labels with your contact list information.
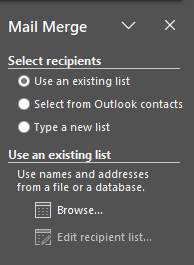
Make sure the option is to “Use and existing list” and then hit “Browse”. Locate the CSV file you downloaded for your address list, select it, and hit “Okay” to upload.
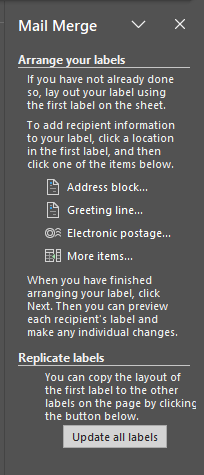
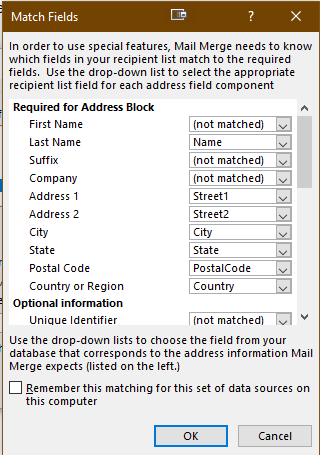
Now we’ll set up the actual label appearance and match up the information in the file with what Word expects. At this point you should have a blank page with a bunch of “<<Next Record>>” entries and one that looks blank. Click anywhere in the blank label and then click “Address block…” in the mail merge wizard to add it.
In the pop-up we’ll need to match the fields up. Note that if you used an export table that pre-formats names, you do NOT need to worry about the recipient name format field (since the query in the export table takes care of name formatting). If you downloaded the entire table that field will determine how the labels look once we match fields.
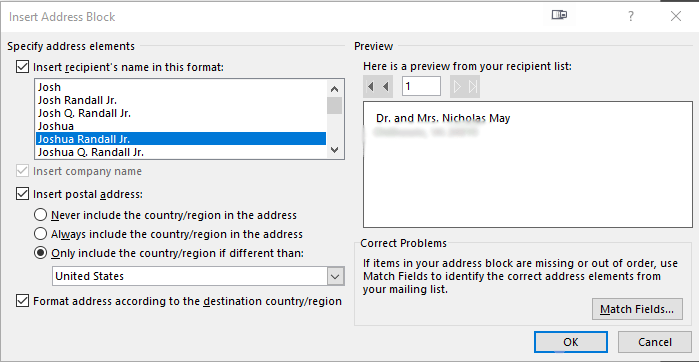
Hit the “Match Fields” button in the lower right to bring up the matching pop-up; we need to tell Word what to look for to match the address fields. If using the export table “Name” can be either first or last name (just not both). Match the remaining fields with the export table fields.
If you’re using the primary table, you can match the remaining fields (nickname, suffix, etc.) to ensure Word uses those fields to match your selected name formatting. Once done, hit “OK”.
Hit “OK” again in the remaining pop-up after verifying that the label addressing looks correct. then, in the wizard panel, hit “Update all labels” to copy the layout to all page labels.
Next you can preview the labels; don’t make changes here just yet if something looks off, just make sure the information is there and correct. Finally, hit “Complete the Merge”. If all labels looked right and you’re happy, go ahead a print (although I recommend printing on a regular paper first). If you need to edit specific recipients, hit the “Edit Individual labels…” option to work on specific labels here to open another document.
Adding/Editing Family Information
Adding or editing information is done directly in-line or through the integrated add form.
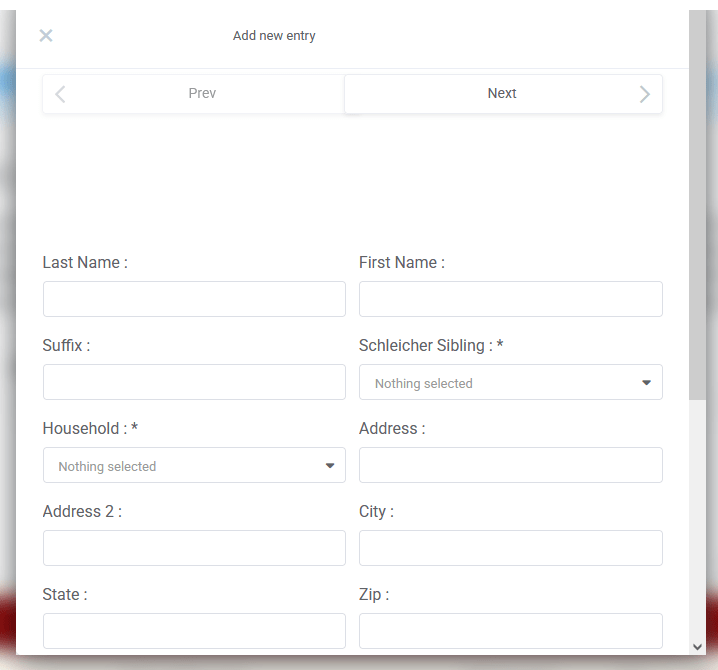
Complete the form to add new members; note that the same form will also edit existing members. To complete, fill out all required fields. You will need to select the correct Schleicher Sibling so I can, as needed, add to the correct family tree branch. Likewise, household indicates head of household. The HoH field drives export tables; flagging someone as HoH will create a separate record in the export tables (useful when a child moves out and has their own address and you want to mail out to them separately).
HoH and Relationships
We’ll take a minute to expand on HoH and relationship fields. The HoH field is an important field (and required) because it drives who gets an entry in the export tables. Let’s start with a simple example:
Now, Aiden has turned 18 and is in college. Aria is still at home with us (and for the purposes of the example, she is 13). We’ll start getting into how relationships work here. Key here is the “include in mailings” field; since Aiden is technically not out on his own yet, he’s still in my household.
Now, let’s say Aiden has moved off on his own finally and gotten married. Aria, on the other hand, is now 24 and living at home.
Last scenario, Aria is still at home, but has a child. We want that to be handled correctly. In this case, Aria would get flagged as HoH; the address of course would remain the same (since the query logic does not look for addresses), but the child would then get assigned to Aria’s household with the child relationship.
How Relationships Work
Relationship to HoH drives formal mailing queries. The etiquette there is a little complex, but the relationship field determines HOW the query builds the address labeling. Additionally, the “include in mailings” field will provide additional overrides to force a person onto the household mailings (e.g., adult children living at home) and give some control over how you want address labels to behave.
Included in Mailings by Default
- Child
- Stepchild
- Grandchild
- Spouse
- Partner
Will be Excluded by default
- Adult Child
- Other Relative
- Parent
- Roommate
- Sibling
Any member excluded by default CAN be included in the mailing label by checking the “include in mailings” field.
FAQ
As of right now, because you cannot edit multiple database rows in an SQL database, you have to add or edit members one at a time.
Photos uploaded here are used for profile photos for the family tree. You can also upload photos here for the site gallery. In general, make sure photos are <6MB (2 MB is better for profile photos) and are JPEG, PNG, or WebP. Other formats won’t be uploaded.
The Head of Household selection is an important function of the table. It drives who gets their own separate entry in the export tables, as well as how households are listed. Selecting someone as a head of household will automatically generate a new line in the export tables and that person will get their own addressing. Any individual that is then included in that person’s household with the HoH field will be included in mailings with exceptions noted above in the exclusions by default for the formal addressing.
Find the child you want to edit in the main table; make sure their relationship is “adult child” to HoH (important if still living part time at home), set the “Include in Mailings” to “False” (this removes them from household mailing lists), and set the “Create Separate Entry” to “True” (should be true by default).
The table has relationships built in. This is important for the formal addressing function (e.g, Mr. and Mrs. John Doe) These relationships define how the formal address table splits groups. Importantly, for the actual HoH, the relationship for the
In certain cases, college namely, we want to have the college address of the child(ren) but still address the family card with all members. To handle these scenarios we’ll use the flag in the edit box to “Include in family addressing”; enabling that box will include that child’s name in the appropriate address options (listed names and formal address options). The other scenario is when a child is still living at home; less important here, but it does allow for them to be included in mailings to that household. If, however, they have their own child, you’ll want to break them off into their own household.
Managing Email Preferences
You can manage what emails are received (family birthdays, anniversaries, and site post updates) by updating your information in the email preference form. You can access the form either from the footer of the family site or by logging into the site, going to your profile, and hitting the “Manage Email Preferences” tab. Fill out the form to unsubscribe from all lists, change the lists you receive notifications from, or change your email address.
Minecraft
So our kids had me set up a private Minecraft server. The advantage to this is that the game persists indefinitely, it’s free, and only users with the Minecraft server address can join. This server is monitored, and unknown players are banned to keep it a safe space. Either direct message me in Mastodon on Schleicher Social or send an email for the server address.
To connect, choose “Multiplayer” and add a new server. Enter the server address for the version of the game you wish to play (survival or creative) and use the specified ports. If in doubt about which port to use, try each and attempt to connect; if connecting via tablet use the bedrock port (UDP port).
Make sure automatic updates are enabled for the app (if that option is available), for the most part you should have no issues with updates as ViaVersion will keep up with server and client updates. Occasionally, if I have not reloaded the Docker image in a while, the client version may get too far ahead of the image version in which case you'll get a server side error. Shoot me an email and when I get a minute I pull a new image and reload the server.
Server Addresses


Creative

Survival
